
UrOops3D, danger-zone atlas
Operative animation, SNM

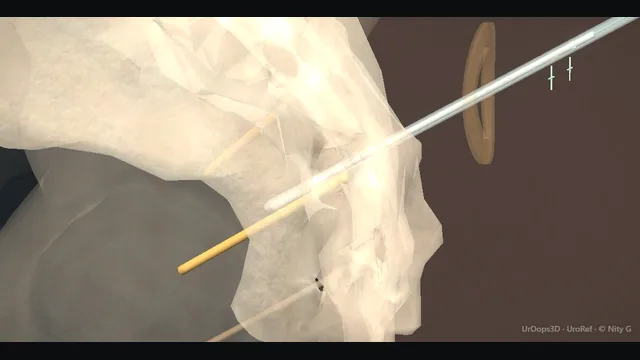
Sacral neuromodulation: S3 lead placement

Two-stage sacral neuromodulation: a foramen needle at the intended target read against motor and sensory responses, an introducer-assisted tined lead beside the root, a diary-driven advanced trial through a remote percutaneous extension, then the permanent generator in the upper buttock.

S3 is preferred, but the response pattern and the trial outcome, not the image alone, decide the implant.

Advanced tier FRCS functional, neuro-urology Interactive 3D

Operative visualisation

Schematic scene preview: Sacral neuromodulation
Preparing the 3D anatomy…

UrOops3D · UroRef · © Nity G

Click me next Section 2 of 8 Anatomy The structures this operation works between, and the one it must not cross.

The structures in the scene

SNM: how the structures relateProne, the posterior sacral plate and the lateral border of the field. S3 foramen: the lead lies beside the root; motor response S3 root. S3 foramen: an S2 or S4 response must not pass for S3 S2 and S4 foramina (danger). S3 foramen: leg pain on insertion means too lateral Sciatic nerve (danger). S3 foramen: about 2 cm off the midline at this level Midline at the sacroiliac joint level. S3 foramen: off the belt line and bone, or it erodes Upper buttock pocket (danger).S3 foramenS3 rootS2 and S4 foramina!Sciatic nerveMidline at thesacroiliac jointlevelUpper buttock pocketthe lead liesbeside the root;motor responsean S2 or S4response must notpass for S3leg pain oninsertion means toolateralabout 2 cm off themidline at thisleveloff the belt lineand bone, or iterodesTargetDangerLandmarkContext
Prone, the posterior sacral plate and the lateral border of the field. Schematic, not to scale; relationships only.
  • Everything is organised around the posterior sacral plate: foramina in a vertical line 2 cm off the midline, the S3 root escaping anterolaterally beneath the foramen the needle enters at 45 to 60 degrees, and the sciatic nerve holding the lateral border of the field.
  • Confirm the intended level from the combined motor, sensory and imaging findings before exchanging the needle for the lead-introduction system.
  • ›S3 foramen - the target; about 2 cm lateral to the midline at the level of the sacroiliac joints.
  • ›S3 root - the amber structure the lead must lie beside; it carries the motor response that confirms placement.
  • ›S2 and S4 foramina - response comparators: S2 gives unwanted outward leg or foot rotation; S4 gives bellows without a toe response and can be appropriate in selected cases.
  • ›Sciatic nerve - the lateral structure a badly angled needle can annoy; leg pain during insertion means stop and reassess.
  • ›Upper buttock pocket - home of the permanent generator; positioned off the belt line and away from bone so it does not erode.
Click me next Section 3 of 8 Steps The operation in order, with the landmark that guards each move.

Operative steps

  1. Surface landmarks The S3 foramen lies approximately 2 cm lateral to the sacral midline, at the level of the sacroiliac joints and the upper border of the greater sciatic notch. The midline is palpated up from the sacral cornua and the vertical line of foramina is marked on both sides before draping, so the marks survive the prep and the towel. Imaging or the bony landmarks themselves confirm the level, because a mark placed one level off is the first step toward a lead at S2 or S4. Both sides are marked even when only one is intended, because the foramina are rarely symmetric when the patient is prone.
  2. Needle insertion at S3 The foramen needle enters the skin mark and advances along the foramen axis, angled anteriorly and laterally 45 to 60 degrees, so it slips into the foramen rather than striking the bony ridge around it. A slight give as the tip enters and a hub that sits stably against skin confirm the needle is in the foramen itself. Depth is kept shallow enough for the tip to lie beside the S3 root, and the position is fine-tuned with test stimulation before anything else is passed. A needle that meets bone is withdrawn partially and re-angled along the axis, never forced.
    where it bites: a needle walked too medial crosses the sacral canal; too lateral and it heads for the sciatic nerve.
  3. Test stimulation The needle or lead is stimulated while the pelvic floor and feet are visible. S3, the preferred target, typically gives pelvic-floor bellows with plantar flexion of the first and second toes; an appropriate perineal or genital sensory response is also considered when the patient can report it. S2 produces outward rotation of the leg or foot and sensation down the leg and should be avoided. S4 produces bellows without a toe response and may be appropriate in selected cases, so it is not automatically a failed placement. Read motor and sensory responses together with the image at each depth and contact before accepting the trajectory.
    where it bites: deploying the tines before the intended response pattern has been demonstrated and documented.
  4. Lead placement After the needle position has been tested, remove its stylet and pass the directional guide to the recorded depth. Withdraw the foramen needle over the guide, then advance the dilator and introducer sheath over the guide into the foramen. Remove the guide and dilator while leaving the sheath in place. Insert the tined lead through the sheath, expose the electrodes to tissue, and stimulate all four contacts; adjust the lead while the tines remain constrained within the sheath. Once the final position is confirmed, hold the lead still and withdraw the introducer sheath and lead stylet under imaging: sheath withdrawal deploys the tines into tissue. Re-test every contact after deployment.
  5. Stage 1 trial This scene shows the advanced staged trial. The permanent tined lead and the lead-to-extension connection remain entirely buried. A separate percutaneous extension is connected in the buried pocket, tunnelled subcutaneously to a skin exit at least 10 cm away, and connected to the external trial stimulator; no part of the tined lead lies outside the body. The patient keeps the symptom diary throughout. Success is clear, consistent improvement on stable settings, conventionally at least halving of the target symptom, and the diary rather than the clinic impression makes the decision.
  6. Stage 2 pocket When the trial succeeds, reopen the buried connection, disconnect the percutaneous extension, and remove that extension from its remote exit before connecting the retained tined lead to the permanent system. Develop a subcutaneous upper-buttock pocket clear of the belt line and bony prominences, tunnel the lead to it, seat the dry connector, and interrogate the complete system before closure. The pocket is sized to close without tension over the generator.
Click me next Section 4 of 8 Danger zones Where this operation bites, and why it bites there.
Critical relationship

Danger zones

The spatial relationships the animation is built to make automatic. Before you read each one, ask yourself: at this point in the operation, what is about to go wrong, and what is my first move? The save for each sits in the Complications tab.

  • RiskResponse does not match the intended target - S2 gives outward leg or foot rotation and should be avoided. S4 gives bellows without toe movement and may be appropriate in selected cases, but must be recognised and accepted deliberately rather than mistaken for S3.
  • RiskSciatic nerve, lateral field - radiating leg pain on insertion means the needle is too lateral; withdraw and re-aim.
  • RiskThe foramen axis - too shallow a needle skims the sacrum; the lead then has no purchase and migrates early.
  • RiskPocket position - a pocket on the belt line or over bone erodes and extrudes; upper buttock, subcutaneous, off the pressure areas.
Practise it Take me into the scene Opens the animation at a danger moment and asks you to predict the mechanism and your first move before it reveals.
Click me next Section 5 of 8 Complications The save for each one: the first move, the escalation trigger, the op-note line.

Complications and immediate saves

Trigger each of these live in the Animation tab, then read the save: the first move, the escalation trigger, and the line that goes in the op note.

S2 response / wrong trajectory

  • the needle or lead is producing outward leg or foot rotation and sensation down the leg rather than the planned S3 response.
The save
  1. Recognise the mismatch the moment it appears: outward rotation of the leg or foot with sensation down the leg is an S2 pattern. first move
  2. Do not advance or deploy; keep stimulating while withdrawing.
  3. Reposition towards the intended target using fluoroscopic anatomy together with motor and, where available, sensory responses.
  4. Before deploying the tines, re-confirm the planned response pattern across the lead contacts. If the pattern remains discordant, stop and obtain experienced help rather than accepting a high-threshold or mixed response. escalation trigger
  5. Op note: responses at each foramen attempted, final lead level, fluoroscopy or landmark method used. document

Infection of pocket or lead

  • wound breakdown or pocket infection around an implant; an infected lead cannot be salvaged with antibiotics.
The save
  1. Recognise it: erythema, discharge, pain over the pocket or lead path, or fever with an implant in situ. first move
  2. Cultures and antibiotics to control the acute episode.
  3. Plan removal: an infected lead or generator is explanted, not suppressed.
  4. Wound breakdown exposing the device, abscess, or systemic sepsis → urgent explantation of generator and lead. escalation trigger
  5. Op note: cultures, components removed, debridement, antibiotic plan, and the interval before re-implantation is considered. document

Lead migration

  • the lead slides back out of the foramen, the responses are lost and the therapy stops working, often after bending or falls.
The save
  1. Suspect it when a working system loses effect: return of symptoms with no change in settings or behaviour. first move
  2. Interrogate the device: rising impedance or loss of the expected response pattern points to displacement.
  3. Re-image the lead position against the baseline films.
  4. Do not simply raise the amplitude to chase the root; reposition or revise the lead surgically. escalation trigger
  5. Op note: symptom change, interrogation findings, imaging, revision performed and responses confirmed on table. document
Click me next Section 6 of 8 Troubleshooting When the case turns: the problem, then the next move.

Intra-operative troubleshooting

When the case turns: the problem, then the next move.

  • ActionNo response at the marked site - return to the landmarks and re-identify the foramen line; a response one level up or down tells you where you actually are.
  • ActionMixed response, some toe and some leg - withdraw partially and re-angle along the foramen axis. Re-test the motor and sensory response at each contact before deciding whether the intended target has been reached.
  • ActionPainful insertion down the leg - withdraw immediately: the needle is too lateral towards the sciatic nerve; re-aim medially along the foramen axis.
  • ActionTrial improvement inconsistent - re-read the diary with the patient; settings, lead position and diary quality all need review before declaring the trial failed.
Click me next Section 7 of 8 FRCS viva Say it out loud, then mark yourself against the model answer.

FRCS viva questions

The examiner stems this scene prepares you for. Try to answer out loud first, then reveal, and learn the discriminator, the detail that turns a pass into a strong pass.

QWhat responses distinguish S3 from S2 and S4 stimulation, and why does it matter?reveal answer
  • Motor and sensory responses form a functional map of the stimulated root.
  • S3 is the preferred target and typically gives pelvic-floor bellows with plantar flexion of the first and second toes;
  • when the patient can report sensation, an appropriate perineal or genital response also supports the position.
  • S2 produces outward rotation of the leg or foot and sensation running down the leg, so it should be avoided.
  • S4 produces pelvic-floor bellows without a toe response and may be an appropriate target in selected cases; it must not be described as universally wrong or therapeutically useless.
  • I therefore identify the intended level from fluoroscopic anatomy, observe motor responses, ask about sensory responses when anaesthesia permits, and test each contact at the lowest effective amplitude before deploying the tines.
  • If the response is discordant with the planned target, the lead is repositioned while the tines remain constrained.
Strong pass

Say both

  • Stating that S3 is preferred rather than uniquely valid: S2 produces outward leg or foot rotation and should be avoided
  • Whereas S4 produces bellows without toe movement and may be appropriate in selected cases
Examiner note
Stating that S3 is preferred rather than uniquely valid: S2 produces outward leg or foot rotation and should be avoided, whereas S4 produces bellows without toe movement and may be appropriate in selected cases.
QExplain the two-stage principle and the criteria for trial success.reveal answer
  • Sacral neuromodulation can be trialled before the permanent generator is implanted.
  • In the advanced staged approach, stage 1 places the potentially permanent tined lead at the intended sacral target and connects it, through a buried connection, to a separate percutaneous extension tunnelled to a remote skin exit and external trial stimulator.
  • The tined lead itself remains entirely implanted.
  • The patient keeps a symptom diary, using frequency-volume charts, incontinence episodes or catheterisation measures appropriate to the indication.
  • Success is a clear, consistent improvement on stable settings, conventionally at least halving of the target symptom across the diary rather than one good day.
  • If the trial succeeds, the percutaneous extension is removed and the retained tined lead is connected to an implantable pulse generator in the upper buttock.
  • If it fails, the lead is removed and no generator is implanted.
Strong pass

Stating the diary, not the clinic impression, as the arbiter, and quantifying the threshold as at least halving of the target symptom on stable settings.

QWhat are the indications for sacral neuromodulation?reveal answer
  • The accepted indications are refractory detrusor overactivity or overactive bladder, urgency, frequency and urge incontinence that have failed conservative treatment and anticholinergic or beta-3 therapy;
  • non-obstructive chronic urinary retention, including Fowler syndrome in women;
  • and, with regulatory variation by country, selected bowel dysfunction such as faecal incontinence and chronic constipation.
  • In every case the pathway is the same: thorough evaluation with diaries, urodynamics where indicated and treatable causes excluded first, then conservative therapy and pharmacological treatment genuinely tried, and only then neuromodulation.
  • It suits the patient whose bladder is neurally dysregulated rather than structurally diseased, so I would not offer it where the bladder is contracted, fibrotic or the outlet mechanically obstructed, and I would treat any urinary infection or significant pelvic pathology first.
  • Posterior tibial nerve stimulation is a lighter alternative for overactive bladder, and botulinum toxin is the other main option for refractory detrusor overactivity, with its own trade of catheterisation and infection risk against retention.
Strong pass

Organising the answer by the three indication groups, refractory overactive bladder, non-obstructive retention including Fowler syndrome, and selected bowel dysfunction, and placing SNM against botulinum toxin and PTNS as alternatives rather than defaults.

QWhy perform test stimulation first rather than implant the device outright?reveal answer
  • Because sacral neuromodulation is unusual among implants in that its effect is immediately and reversibly testable, and its response is genuinely unpredictable between patients, since the mechanism is modulation of reflex pathways rather than correction of an anatomy.
  • Test stimulation answers two questions for the price of one.
  • First, physiology: does this patient have the correct sacral reflex responses at S3, which confirms the root is reachable and the lead can be positioned.
  • Second, therapy: does modulation of that root actually change the symptoms of this patient, which no imaging or urodynamic measurement can predict.
  • Implanting without the trial would commit perhaps half of patients, in whom neuromodulation would not have worked, to a permanent generator, a pocket and a lifetime of device maintenance.
  • The trial also protects the stage 2 decision socially and medically: the patient experiences the sensations and the diary discipline before the permanent implant, and a failed trial leaves only a lead to remove.
  • So the test phase is not a preliminary step, it is the core of the operation: a therapy that proves itself before it is implanted.
Strong pass

Say all three

  • Framing the trial as answering two distinct questions
  • Physiological access to S3 and therapeutic response in this patient
  • Naming that no investigation predicts the second
Examiner note
Framing the trial as answering two distinct questions, physiological access to S3 and therapeutic response in this patient, and naming that no investigation predicts the second.
Click me next Section 8 of 8 Evidence The guidance each of these answers is built on.

Evidence and guidance

Two minutes

Close the lap: recall it before you leave.

Say it aloud, then reveal. Reading is not remembering.

  1. 01 The relationship Say the critical spatial relationship out loud, then reveal. reveal
    Memory frame

    Everything is organised around the posterior sacral plate

    Why?
    Everything is organised around the posterior sacral plate: foramina in a vertical line 2 cm off the midline, the S3 root escaping anterolaterally beneath the foramen the needle enters at 45 to 60 degrees, and the sciatic nerve holding the lateral border of the field. Confirm the intended level from the combined motor, sensory and imaging findings before exchanging the needle for the lead-introduction system.
  2. 02 The first move S2 response / wrong trajectory. Your first move? reveal
    First move

    Recognise the mismatch the moment it appears: outward rotation of the leg or foot with sensation down the leg is an S2 pattern.

  3. 03 The escalation trigger S2 response / wrong trajectory. What makes you call for help? reveal
    Escalate when

    Before deploying the tines, re-confirm the planned response pattern across the lead contacts.

    More detail
    If the pattern remains discordant, stop and obtain experienced help rather than accepting a high-threshold or mixed response.
  4. 04 The discriminator What turns a pass into a strong pass? reveal
    Strong pass

    Say both

    • Stating that S3 is preferred rather than uniquely valid: S2 produces outward leg or foot rotation and should be avoided
    • Whereas S4 produces bellows without toe movement and may be appropriate in selected cases
    Examiner note
    Stating that S3 is preferred rather than uniquely valid: S2 produces outward leg or foot rotation and should be avoided, whereas S4 produces bellows without toe movement and may be appropriate in selected cases.
  5. 05 The pitfall Where does this operation bite first? reveal
    Pitfall

    Response does not match the intended target

    Why?
    S2 gives outward leg or foot rotation and should be avoided. S4 gives bellows without toe movement and may be appropriate in selected cases, but must be recognised and accepted deliberately rather than mistaken for S3.

Revision practice with self-marked answers, not an assessment of clinical competence. Kept in this browser only; it does not sync between devices.