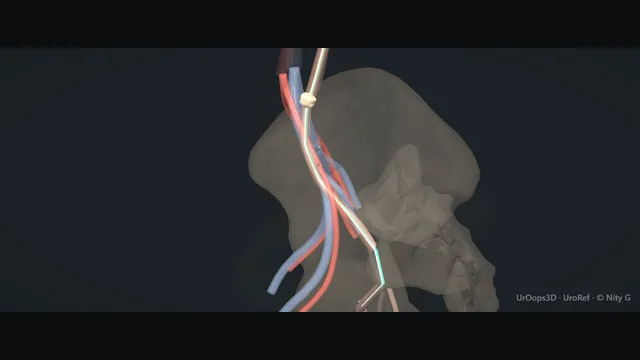
Retrograde from the bladder to an impacted ureteric stone: a safety wire first, a second wire through the semirigid scope, the ureter tented on both and the scope railroaded up.
Holmium or thulium dusting, never large fragments; clearance by gravity with a basket only if needed; a JJ stent only when the ureter needs one. The wall is thinnest where the stone has sat longest, and that is where it tears.
Core tierFRCS endourology, stone diseaseInteractive 3D
Owner-confirmed typical sizes for teaching: check them against the scopes on your own tray. Drawings are to relative scale within each panel, not between panels.
How to use this module. Watch the two wires: the teal safety wire goes up first, the white working wire through the scope. The card under the animation gives the scope, channel and wire sizes.
Bladder view: cystoscopy and the safety wireA septic or obstructed system is drained first and the stone left for another day; the urine is known to be sterile or the infection treated before any scope goes up. Cystoscopy is performed and the bladder surveyed: the trigone, both orifices, the left one the target. A 0.035 inch safety wire is advanced up the orifice under fluoroscopy, its course read against each narrowing, until it curls in the renal pelvis. It is the centre wire, placed first, and it stays for the whole case, so that whatever happens to the scope, the stone or the wall, access to the upper tract is never lost. Its position is confirmed on screening before the cystoscope comes out.
Second wire through the semirigid scope, tent and railroadThe semirigid ureteroscope goes in with a second, working wire already through its channel and is brought to the orifice beside the safety wire. The working wire is advanced up the ureter through the scope; it exists only to guide the scope and is withdrawn once the stone is seen. With both wires held gently taut the ureter tents and straightens, and the scope is railroaded over the working wire with every level of the lumen entered under direct vision. The physiological narrowings each announce themselves as a catch and are crossed by withdrawing slightly, realigning and advancing, not by pushing. A tight orifice yields to rotating the scope through 180 degrees; a sheath rarely helps in the ureter. Never advance against resistance: that is how the wall tears. where it bites: never advance against resistance - that is how the wall tears.
Laser: dust it, never chunk itThe working wire is pulled once the stone is in view and the safety wire kept. The holmium or thulium fibre is passed down the working channel and advanced a short distance beyond the scope before firing, its tip kept visibly on the stone and off the mucosa and well clear of the lens. Irrigation is kept to a trickle so the stone is not flushed back to the kidney. The stone is dusted at low energy, face by face, painted rather than cracked. Never fragment in the ureter into large pieces: they scatter, they do not pass, and they invite the pull that avulses. Firing on the wall rather than the stone perforates within seconds. where it bites: firing on the wall, not the stone, perforates within seconds.
Clearance: gravity first, basket if neededDust and fine fragments are left to clear downwards by gravity and the trickle of irrigation. A fragment too big to clear on its own is taken with a nitinol basket opened beyond the scope, one piece at a time, and drawn back only after the test before any pull: the engaged piece comes to the scope tip without the basket bowing or the wall dimpling. One representative fragment goes for analysis. A fragment that resists is released and lasered smaller, never pulled. Pulling an over-large fragment in a basket is the classic route to avulsion, and it happens at the thin proximal wall where nothing can be repaired from below. where it bites: pulling an over-large fragment in a basket is the classic route to avulsion.
Exit + selective JJ stentThe scope is withdrawn under vision with the whole length of the ureter inspected on the way out for a tear, a flap or extravasation. An uncomplicated ureteroscopy needs no routine stent; one is placed over the safety wire under screening for wall injury, oedema, residual fragments, bleeding, infection, a solitary kidney or uncertain drainage. Its length is matched to the patient and the treated segment so neither coil sits under tension, the wire is withdrawn under screening as the proximal coil forms, and the position is confirmed by the distal coil seen in the bladder and the proximal coil on the screen rather than assumed. Every stent leaves theatre with a removal date written in the note and the stent register, because a forgotten stent is the complication that follows the operation home.
The spatial relationships the animation is built to make automatic. Before you read each one, ask yourself: at this point in the operation, what is about to go wrong, and what is my first move? The save for each sits in the Complications tab.
RiskImpacted segment - oedematous, friable, and the easiest place to perforate or avulse.
RiskProximal ureter on withdrawal - the wall is thinnest proximally; avulsion classically happens dragging a basketed stone up through the proximal segment.
RiskFibre tip off-target - a few millimetres of mucosa is all that separates the lumen from extravasation.
Trigger each of these live in the Animation tab, then read the save: the first move, the escalation trigger, and the line that goes in the op note.
Perforation / extravasation
irrigant tracks beyond the wall; stop, stent, image.
Most settle with drainage.
The save
Stop. Stop advancing the scope and stop lasing the instant you suspect it.first move
Keep the safety wire across the injury - do not lose access to the upper tract.
A gentle retrograde contrast run confirms it: irrigant or contrast tracking beyond the lumen.
Place a JJ stent across the segment over the wire; most small perforations settle with drainage alone.
A large defect, free extravasation, or a wire you cannot keep across → senior help; consider nephrostomy and abandon.escalation trigger
Op note: site of perforation, safety wire retained, stent size placed, planned imaging and follow-up.document
Ureteric avulsion
full-thickness loss of a segment - the worst URS complication; retain access and call for help early.
The save
Stop all traction immediately - do not pull the scope or basket any further.first move
Retain access on the safety wire; it is your only bridge to the upper tract.
Call for senior / consultant help now - this is not one to manage solo.escalation trigger
Temporise and protect the kidney: nephrostomy with or without a stent to drain.
Definitive repair is segment-dependent: distal loss → re-implantation (psoas hitch / Boari flap); long or proximal loss → ileal ureter, autotransplantation, or nephrectomy in extremis.
Op note: segment and length lost, access retained, temporising drainage, referral to a reconstructive centre.document
Impacted stone + oedema
friable mucosa around a chronic stone; dust gently or stent and return rather than force.
The save
Stop forcing - never push the scope against resistance through an impacted segment.first move
Read the field: oedematous, friable mucosa is a perforation and avulsion waiting to happen.
If vision and access are safe, dust at low energy in situ; do not basket an impacted stone.
If you cannot proceed safely, place a JJ stent and stage the case 1–2 weeks later through a passively dilated ureter.escalation trigger
Op note: impaction and oedema, what was and was not done, stent placed, staged plan.document
When the case turns: the problem, then the next move.
ActionScope will not pass - do not force; place a stent and return in 1–2 weeks to a passively dilated ureter.
ActionPoor vision from dust - pause lasing, increase irrigation flow, reposition the fibre tip onto the stone.
ActionStone migrates proximally - use an anti-retropulsion device or lower energy / higher frequency dusting settings.
ActionBasket impacted on a fragment - do not pull; release or laser the fragment within the basket before disengaging.
ActionFragment too large to pass - do not basket it out through the ureter; laser it smaller in situ until it will clear by gravity, then basket only what is left.
ActionSafety and working wire confused - the safety wire is the one beside the scope that never moves; the working wire is the one that comes out of the scope tip and is withdrawn at the stone.
The examiner stems this scene prepares you for. Try to answer out loud first, then reveal, and learn the discriminator, the detail that turns a pass into a strong pass.
QA guidewire will not pass an impacted mid-ureteric stone. What are your options?reveal answer
I would not force the wire.
First I would confirm position with a retrograde study and try a hydrophilic or angled guidewire under screening, with gentle torque past the stone.
If it will not pass, I would not proceed with rigid instrumentation against resistance.
My safest option is to place a JJ stent alongside the stone if I can pass a wire past it, or, if not, to obtain access for drainage and return in one to two weeks to a passively dilated ureter - which makes both wire passage and stone clearance far easier and safer.
If the patient is septic or obstructed, decompression (stent or nephrostomy) takes priority over stone treatment.
Strong pass
Stent, then return to a passively dilated ureter
Staged→Stent and come back to a passively dilated ureter
Obstructed→Obstructed or septic: decompress before you clear stone
Examiner note
Naming the staged approach - stent and return to a passively dilated ureter - and putting decompression before stone clearance in an obstructed or septic patient.
QYou see extravasation of irrigant on fluoroscopy. What has happened and what do you do?reveal answer
There is a ureteric perforation and irrigant is tracking beyond the lumen.
I would stop advancing and stop lasing immediately, and keep my safety wire across the injury so I never lose access.
I would confirm with a gentle retrograde contrast run, then place a JJ stent across the segment over the wire; the great majority of small perforations settle with stent drainage.
I would limit further irrigation.
If there is a large defect, free extravasation, or I cannot keep a wire across, I would stop, call for senior help, consider a nephrostomy, and abandon the procedure.
I would document the site, the retained access, the stent, and arrange follow-up imaging before stent removal.
Strong pass
Say all three
Retaining the safety wire as the first priority
Distinguishing the small perforation (stent, settles) from the one that needs senior help
Nephrostomy and abandonment
Examiner note
Retaining the safety wire as the first priority, and distinguishing the small perforation (stent, settles) from the one that needs senior help, nephrostomy and abandonment.
QHow do you counsel a patient on the risk of ureteric avulsion before URS?reveal answer
I would explain that ureteroscopy is generally safe but carries a small risk of injury to the ureter, the most serious being avulsion - a full-thickness tear that is rare (well under 1%) but important because it usually needs further, sometimes major, reconstructive surgery such as re-implantation or replacing the ureter, and occasionally removal of the kidney.
I would set it in context: I take specific steps to avoid it - a safety wire, working under vision, never forcing the scope, and dusting rather than dragging large fragments.
I would cover the commoner risks too (infection, bleeding, stent symptoms, the need for a second procedure) and document consent.
Strong pass
Say both
Quoting that avulsion is rare (<1%) but consequential
Naming the specific intra-operative habits that prevent it rather than just listing the risk
Examiner note
Quoting that avulsion is rare (<1%) but consequential, and naming the specific intra-operative habits that prevent it rather than just listing the risk.
QDusting versus fragmentation - justify your choice for a 1 cm proximal ureteric stone.reveal answer
For a 1 cm proximal ureteric stone I would favour dusting with a high-frequency, low-energy holmium or a thulium fibre laser.
A proximal stone is at risk of retropulsion into the kidney, and low pulse energy with anti-retropulsion settings keeps the stone in place while reducing it to passable dust, avoiding the traction on a thin proximal wall that risks avulsion.
Fragmentation with active basket retrieval gives a stone for analysis and a clear ureter, but pulling fragments through the proximal segment is exactly the manoeuvre that avulses.
So I would dust, retrieve a single representative fragment for analysis if it is safe, and stent.
My choice is driven by stone position, retropulsion risk, and protecting the proximal wall.
Strong pass
Linking the choice to stone position and retropulsion / avulsion risk - not just reciting "dusting is faster" - and still securing a fragment for analysis.
Say it aloud, then reveal. Reading is not remembering.
01The relationshipSay the critical spatial relationship out loud, then reveal.reveal
Memory frame
Millimetres of wall, thinnest where the stone is impacted
Wall→Only millimetres thick
Impaction→The thinnest point
The case→Clear the stone, respect the wall
Why?
The ureteric wall is only millimetres thick and thinnest where the stone has been impacted. The whole case is a negotiation between clearing the stone and respecting that wall.
02The first movePerforation / extravasation. Your first move?reveal
First move
Stop: stop advancing, stop lasing
The instant you suspect it.
More detail
Stop. Stop advancing the scope and stop lasing the instant you suspect it.
03The escalation triggerPerforation / extravasation. What makes you call for help?reveal
Escalate when
A large defect, free extravasation, or a wire you cannot keep across
Senior help
Consider nephrostomy
Abandon
More detail
A large defect, free extravasation, or a wire you cannot keep across → senior help; consider nephrostomy and abandon.
04The discriminatorWhat turns a pass into a strong pass?reveal
Strong pass
Stent, then return to a passively dilated ureter
Staged→Stent and come back to a passively dilated ureter
Obstructed→Obstructed or septic: decompress before you clear stone
Examiner note
Naming the staged approach - stent and return to a passively dilated ureter - and putting decompression before stone clearance in an obstructed or septic patient.
05The pitfallWhere does this operation bite first?reveal
Pitfall
The impacted segment: oedematous and friable
The easiest place to perforate or avulse.
Why?
Impacted segment: oedematous, friable, and the easiest place to perforate or avulse.
Revision practice with self-marked answers, not an assessment of clinical competence. Kept in
this browser only; it does not sync between devices.