
Prostatic urethral lift
Cystoscopic placement of transprostatic implants that retract obstructing tissue and enlarge the prostatic urethral lumen without tissue resection.
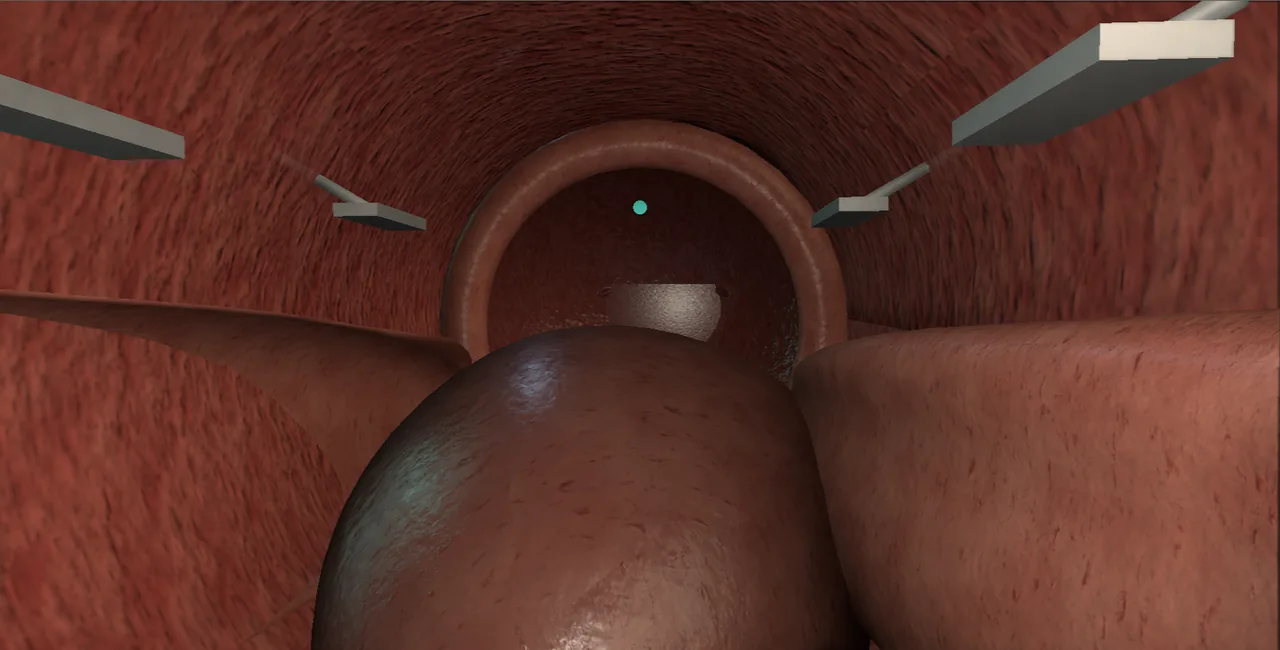 Interactive 3D Interactive prostatic urethral lift Open the 3D animation
Teaching catalogue only. This coverage record is not a patient pathway or operative instruction.
Typical place in practice
Selected benign prostatic obstruction with favourable anatomy and a preference for a minimally invasive, implant-based approach.
Alternatives and neighbouring procedures
Medication, water-vapour therapy, TURP, enucleation, vaporisation, Aquablation or catheter strategies.
Same procedure family, explicit technique branches
These are variations of this canonical operation. Complication modules below identify whether they apply to all branches or only to named approaches.
Lateral-lobe prostatic urethral lift
Paired implants retract lateral adenoma away from the urethral lumen.
Obstructive median-lobe lift
A selected median lobe is displaced away from the outlet using a device-specific strategy.
Salvage or additional implant placement
Additional implants address an untreated segment or inadequate channel after reassessment.
High-level sequence
Coverage outline only; not a step-by-step technical guide.
- Confirm gland configuration and implant suitability
- Inspect bladder neck, ureteric orifices and prostatic urethra
- Map implant positions relative to sphincter and bladder neck
- Deploy implants with controlled depth and verify the channel
- Account for devices and document later implications for endoscopy or surgery
The operation, step by step
A step that touches one of this module's danger zones is marked and cross-linked below.
- SetupLocal, sedation or general anaesthesia, lithotomy position, UroLift delivery system prepared, antibiotic prophylaxis given.
- AccessPass the cystoscope under vision and confirm implant-suitable anatomy: lateral lobes, or a median lobe only with the median-lobe configuration.
- Measure the prostatic urethra from bladder neck to verumontanum and choose the implant count from the length.
- Note the ureteric orifices with median-lobe treatment in mind, because a median-lobe implant sits close to the trigone. danger zone: Ureteric orifices with median-lobe treatment
- Deploy the bladder-neck implant first: pass the needle through adenoma under vision until the tab catches on the outside of the gland.
- Check the tab has engaged the prostatic capsule and neurovascular tissues without excessive depth. danger zone: Prostatic capsule and neurovascular tissues
- Place the apical implant just proximal to the external sphincter and verumontanum, under direct vision. danger zone: External sphincter and verumontanum
- Add middle implants so the lateral lobes are compressed into an open channel, or hold a median lobe forward with the median-lobe implant.
- Inspect every implant: the urethral end tab lies flat on mucosa without tension and no implant sits intravesically.
- Confirm an open channel from bladder neck to veru and record the implant count and positions.
- ClosureNo closure: catheter only if the channel needs rest.
- AftercareShort catheter or none, expect dysuria and haematospermia for some weeks, and review with a flow study at about three months.
Every failure mode is its own module.
Timing and variation coverage are recorded for each module.
Dysuria, urgency, pelvic pain or haematuria
Needle passage, capsular tabs and mucosal irritation can cause short-term urinary symptoms, discomfort and bleeding.
Applies to: Lateral-lobe prostatic urethral lift · Obstructive median-lobe lift · Salvage or additional implant placementAcute urinary retention
Swelling, bleeding or an inadequate channel may prevent voiding after the procedure.
Applies to: Lateral-lobe prostatic urethral lift · Obstructive median-lobe lift · Salvage or additional implant placementUrinary infection
Instrumentation, retention and temporary catheterisation contribute to infection risk.
Applies to: Lateral-lobe prostatic urethral lift · Obstructive median-lobe lift · Salvage or additional implant placementImplant malposition, migration or encrustation
An implant too close to the bladder can become exposed, migrate or act as a nidus for mineral deposition.
Applies to: Lateral-lobe prostatic urethral lift · Obstructive median-lobe lift · Salvage or additional implant placementCapsular penetration or adjacent-tissue pain
Device deployment beyond the intended depth can injure extraprostatic tissue or produce persistent pelvic symptoms.
Applies to: Lateral-lobe prostatic urethral lift · Obstructive median-lobe lift · Salvage or additional implant placementSexual-function change
The technique aims to preserve sexual function, but ejaculatory, erectile or discomfort-related changes remain possible.
Applies to: Lateral-lobe prostatic urethral lift · Obstructive median-lobe lift · Salvage or additional implant placementPersistent obstruction or retreatment
Implants do not remove tissue; inadequate displacement or progressive adenoma may require repeat or alternative surgery.
Applies to: Lateral-lobe prostatic urethral lift · Obstructive median-lobe lift · Salvage or additional implant placementComplexity during later outlet surgery
Retained implants can alter later resection, enucleation, laser use or morcellation and should be anticipated.
Applies to: Lateral-lobe prostatic urethral lift · Obstructive median-lobe lift · Salvage or additional implant placementSources for this module
Contemporary outlet procedures, selection, variants and functional trade-offs.
Accessed 2026-08-03 · opens source European Association of Urology EAU Guidelines on Urological InfectionsInfection prevention, recognition and procedure-associated infection context.
Accessed 2026-08-03 · opens source British Association of Urological Surgeons Patient information leaflets by procedureUK patient-facing procedure, alternatives, recovery and complication framing.
Accessed 2026-08-03 · opens source